Basic Civil & Mechanical Engineering: UNIT III: i. Plastering
Plastering
Purposes, Requirements or Qualities, Types of Mortars, Different Stages, Defects and Precautions
Plaster: The mortar used for plastering is called Plaster.
UNIT – III
Chapter – 6 (E)
PLASTERING
Plastering:
Plastering
is the process of covering the rough inner and outer faces of walls, beams,
columns and ceilings with a protective layer. This layer is of cement mortar or
lime mortar.
Plaster:
The mortar used for plastering is called Plaster.
1. PURPOSES OF PLASTERING
1.
Smooth Appearance: Plastering provides even, smooth,
regular and clean surfaces to walls, columns, beams, etc., to improve
appearance.
2.
Durability: Plastering improves the durability of
the exposed surfaces of walls, etc.
3.
Concealing Defects: Plastering conceals the un-evenness and
other defects in workmanship. It conceals the use of inferior and porous
materials used in masonry walls, concrete beams, etc. Also, it conceals the
defects in the joints of the masonry work.
4.
Effects of Atmospheric Agencies: Plastering prevents
damping of the walls, etc., due to atmospheric agencies like rain, sun, wind,
etc.
5.
Base: Plastered surface forms a satisfactory base for
white washing, colour washing, distempering or painting.
2. REQUIREMENTS or QUALITIES OF A GOOD PLASTER
1.
Workability: A good plaster should possess good
workability property.
2.
Adherence: A good plaster should adhere to the surface firmly.
3.
Appearance: It should provide the surface a
decorative appearance.
4.
Durability: A good plaster should be durable.
5.
Atmospheric Agencies: A good plaster should resist the
effects of atmospheric agencies.
6.
Smooth and Even Surface: It should provide a smooth, even
and washable surface.
7.
Shrinkage and Cracking: A good plaster should not shrink
while drying. Shrinkage may cause cracking of the surface.
8.
Insulation: A good plaster should have good insulation
property against sound and heat.
3. TYPES OF MORTARS USED FOR PLASTERING
1.
Cement Mortar
Cement
Mortar is a mixture of Portland cement and coarse sand. The usual mix for
cement mortar for plastering varies from 1 : 3 for the surfaces in contact with
water (bathroom, etc.) to 1:4 to 1 : 6 for other surfaces.
'ment
and sand are thoroughly mixed in a dry state. The mixture is added with
required cement of water to make a plastic mass or paste of desired consistency
and workability.
Precaution:
The wet mortar should be used within 30 minutes, because the cement starts
setting after about 30 minutes.
2.
Lime Mortar
Lime
Mortar used for plastering is prepared as follows: Equal volumes of lime and
fine sand are thoroughly mixed. The mixture is ground in a mortar mill by
adding required quantity of water to form a paste of required consistency and
workability.
3.
Water-Proof Mortare
It
is prepared by mixing 1 part of cement with 2 parts of sand and pulverized
alum. Soap water is added to this dry mixture to make it water-proof and to
obtain required consistency and workability. This mortar is used for
water-retaining structures.
Mortars
Used for Different Plastering Works
For
interior and exterior plastering, we may use the following proportions:
Cement
Mortar (Cement-Sand Plaster) 1:4
Lime
Mortar (Lime Plaster) 1:1
Lime
Surkhi Plaster 1:2
4. DIFFERENT STAGES IN PLASTERING
Number
of Plaster Coats
Plastering
may be done in one or two or three coats. One coat of plaster is used in Cheap
and Unimportant Buildings. Two coats may be applied for Ordinary Buildings.
Three coats are applied for Superior Buildings. Partially-set mortar should not
be used for plastering.
Plastering
is always started from the top of the surface to be plastered and worked
downwards. The following procedure is adopted for plastering:
1.
Mortar Joints: Mortar Joints of wall to be plastered
are racked out to a depth of 20 mm.
2.
Background Surface: Background surface is made even and
uniform by removing the projections. It is cleaned by brushing and is
roughened. Surface is then wetted.
3.
Preparation of Plaster: The plaster is prepared in suitable
proportion depending on the requirement. The ceiling is plastered first and
then the walls.
4. Preparation of Screeds: See Fig. 1.
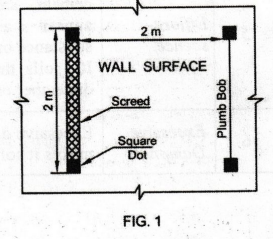
To
obtain uniform thickness of plastering, a Dot of 15 cm x 15 cm square and 10 mm
thick is marked using a small quantity of mortar on the wall surface. Another
dot is fixed 2 m vertically below.
These
two dots are checked by plumb bob. These are joined with a vertical strip of
mortar, called Screed.
Screeds
are placed at a horizontal distance of 2 m. Plaster is applied between them to
obtain uniform thickness.
5.
Plastering of First Coat: The mortar placed as above between
successive screeds is called First Coat. The surface is levelled using trowel
and finished. Curing is done for 7 days.
6.
Plastering of Second Coat: For Two Coat Plastering, the
surface of first coat should not be finished smooth, but left rough. Second
coat is applied after 2 days. Curing is done for 7 days.
7.
Plastering of Third Coat: Depending of the appearance, the
Third Coat is as follows:
Rough
Coat Finish: The finishing mortar of 1 : 3 mix for
rough coat finish is prepared with coarse grained sand. It is dashed against
the surface to be plastered. The surface is roughly finished by light movements
of a wooden float.
Smooth
Coat Finish: Smooth Coat Finish is just similar to
rough coat finish. The only difference is fine grained sand is used instead of
coarse grained sand.
8.
Plastering of Decorating Piece: It should be finished
before the finishing coat is applied.
9.
Rounding of Corners: Rounding of corners and edges should be
carried out along with the finishing coat in order to prevent any joint mark
appearing after some time.
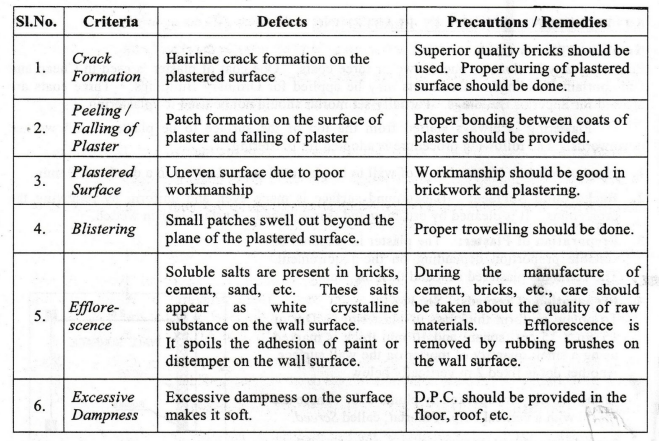
5. PLASTERING DEFECTS AND PRECAUTIONS
Basic Civil & Mechanical Engineering: UNIT III: i. Plastering : Tag: : Purposes, Requirements or Qualities, Types of Mortars, Different Stages, Defects and Precautions - Plastering
Related Topics
Related Subjects
Basic Civil and Mechanical Engineering
BE3255 2nd Semester 2021 Regulation | 2nd Semester EEE Dept 2021 Regulation